Working with Images
As you copy-paste contents from LG1 to LG2, we recommend:
- Go into the Plain-Text Editor in the box in LG1. This should ensure that your formatting will remain intact when you paste into LG2.
- SELECT all the code there and COPY it.
- Go into the analogous box in LG2
- Click on Source (last item in the second line of the toolbar)
- PASTE from your clipboard
At first glance, everything should look just fine: all your text, with its formatting, along with any images in your Rich Text/HTML box in LG1.
But wait a minute! The code you copied from LG1 into LG2 contains a link to the image in LG1. When LG1 goes away, that image will go away as well.
What to do? Click on the Images tab (this is an example of a Tabbed Box).
What to do? For each image that you want to re-use in LG2, you will need to download it to your computer, then re-upload it to LG2.
 Image Management in LG2 is similar to that in LG1, with one nice improvement: the ability of organize your images into folders, in order to make them easier to find. When you first click on the Image tool in the toolbar, you'll see the Image Properties box.
To either add a new image or re-use an existing one, click on the Browse Server button.
BTW, in the interests of accessibility, please include a meaningful description of each image in the Alternative Text field of the Image Properties box.
You will see a new window with a box something like this: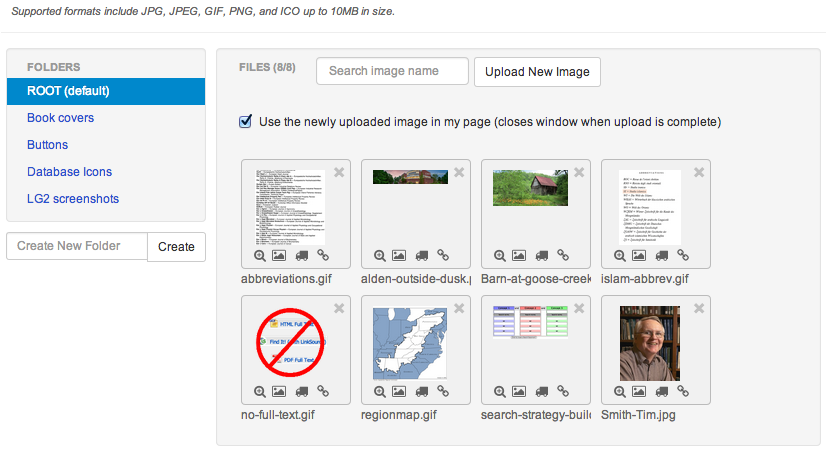
On the left side of the image above, you see the names of folders for particular kinds of images. You create those folders yourself, naming them whatever you want. It's highly recommended to give the names of the images themselves meaningful names so that you can find them easily by searching as well as visually scanning.
Working with Images
This is likely to be the most laborious, and initially confusing, part of the process. When you copy and paste the code from LG1 into LG2, the images will look just fine. They are not just fine. They are still residing on the LG1 servers and will go away altogether once we go live with LG2. In order to move your images from LG1 to LG2, follow these steps:
- Save the LG1 image to the desktop or other folder on your computer.
- In LG2 the Image Manager is under the Content dropdown menu in the orange menubar. The uploading procedure is similar to that in LG1.
- Upload the image from your desktop into the LG2 Image Manager. Note that there is a new feature that allows you to organize your images by creating folders. For instance, I have folders for book covers, buttons, database icons, etc.
- To add an image to a content box in your Guide, click on the little Image icon in the second row of the editor toolbar, then click on the Browse Server button to get access to your set of images. Click on the little Insert Image icon below the thumbnail to add it to your content.
- In the Image Properties window, be sure to add some Alternative Text that clearly describes the image. This is important for usability. The HSpace and VSpace properties are measured in pixels and provide a little “breathing room” between images and adjacent text. I usually use the value of “4”—YMMV. Once all the properties are set—see below for resizing—click OK.
- Resizing images: unfortunately, this is much more difficult in LG2 than in LG1. You can no longer resize images directly in the Editor by clicking on them and using your mouse to move the “handles” at the corners of the images. Springshare is aware of this problem (a by-product of the third party editing module they’re using) but has so far made no promises about fixing it. There are two approaches to getting images the right size for your content boxes:
- Estimate the needed size before you upload, then use an external editor to change the image to that size.To give you an idea of scale, the Content Box areas in our LG2 are about 860 pixels wide. so if you want an image to occupy about half the width of a box, reduce the width parameter in the Image Properties box to about 430 pixels—the height should adjust to keep the proportions. You can scale with other ratios as needed. The other, more hit-or-miss option would be to use an external editor to make the image the desired size before uploading.
- While viewing the image in the Image Properties window you will see their widths and heights. Reduce these sizes until you get the image to be approximately the size you need. Make these reductions proportionally (e.g., change 400x300 to 200x150) in order to avoid distorting the images.
 On the right is a screenshot from the LG1 Links & Lists type of box. The same principles will apply to the Simple Web Links boxes in LG1.
In LG2 there is only a single Links type of content. (If you're using the Books from the Catalog type of box in LG1, note that it still exists as its own type of content in LG2.)
We strongly urge you to use Links for any significant lists of URLs, since the Libguides link checker will work with it, but not with links included in the Rich Text/HTML type of content.
All you need to do is to have browser windows (or tabs) open to both the LG1 and LG2 versions of the guide you're working on, and copy-paste one field at a time from LG1 to LG2.
This is a really good time to evaluate your links—ALL your links, not just the ones in Links & Lists:
- Are they worth keeping in terms of their content?
- Do they still work? Please check them before moving them to LG2!!!
If you're using RSS feeds in your Guides, all you need to do is copy the title and RSS feed link into the RSS Feed content type in LG2. If you're using the feeds the Carrie made for new items in ALICE and you want the book covers to display, you will need to be sure to choose Display beneath item title option the Add/Edit Content box of the RSS feed. See example below:
Widgets include Chat Boxes, links to videos, etc. In the Standard box, choose Media / Widget and insert the widget code, e.g., something like: <iframe width="560" height="315" src="//www.youtube.com/embed/BY1sJjbOtbM" frameborder="0" allowfullscreen></iframe> If you need to resize them, you can change the values in the width and height parameters proportionally.
Example below: